a party studio

Printable party supplies, ideas and creativity

Tutorial: Removing Label From A Starbucks Frappucino Bottle April 25, 2013

how to clean and use Starbucks Frappuccino bottles for your party

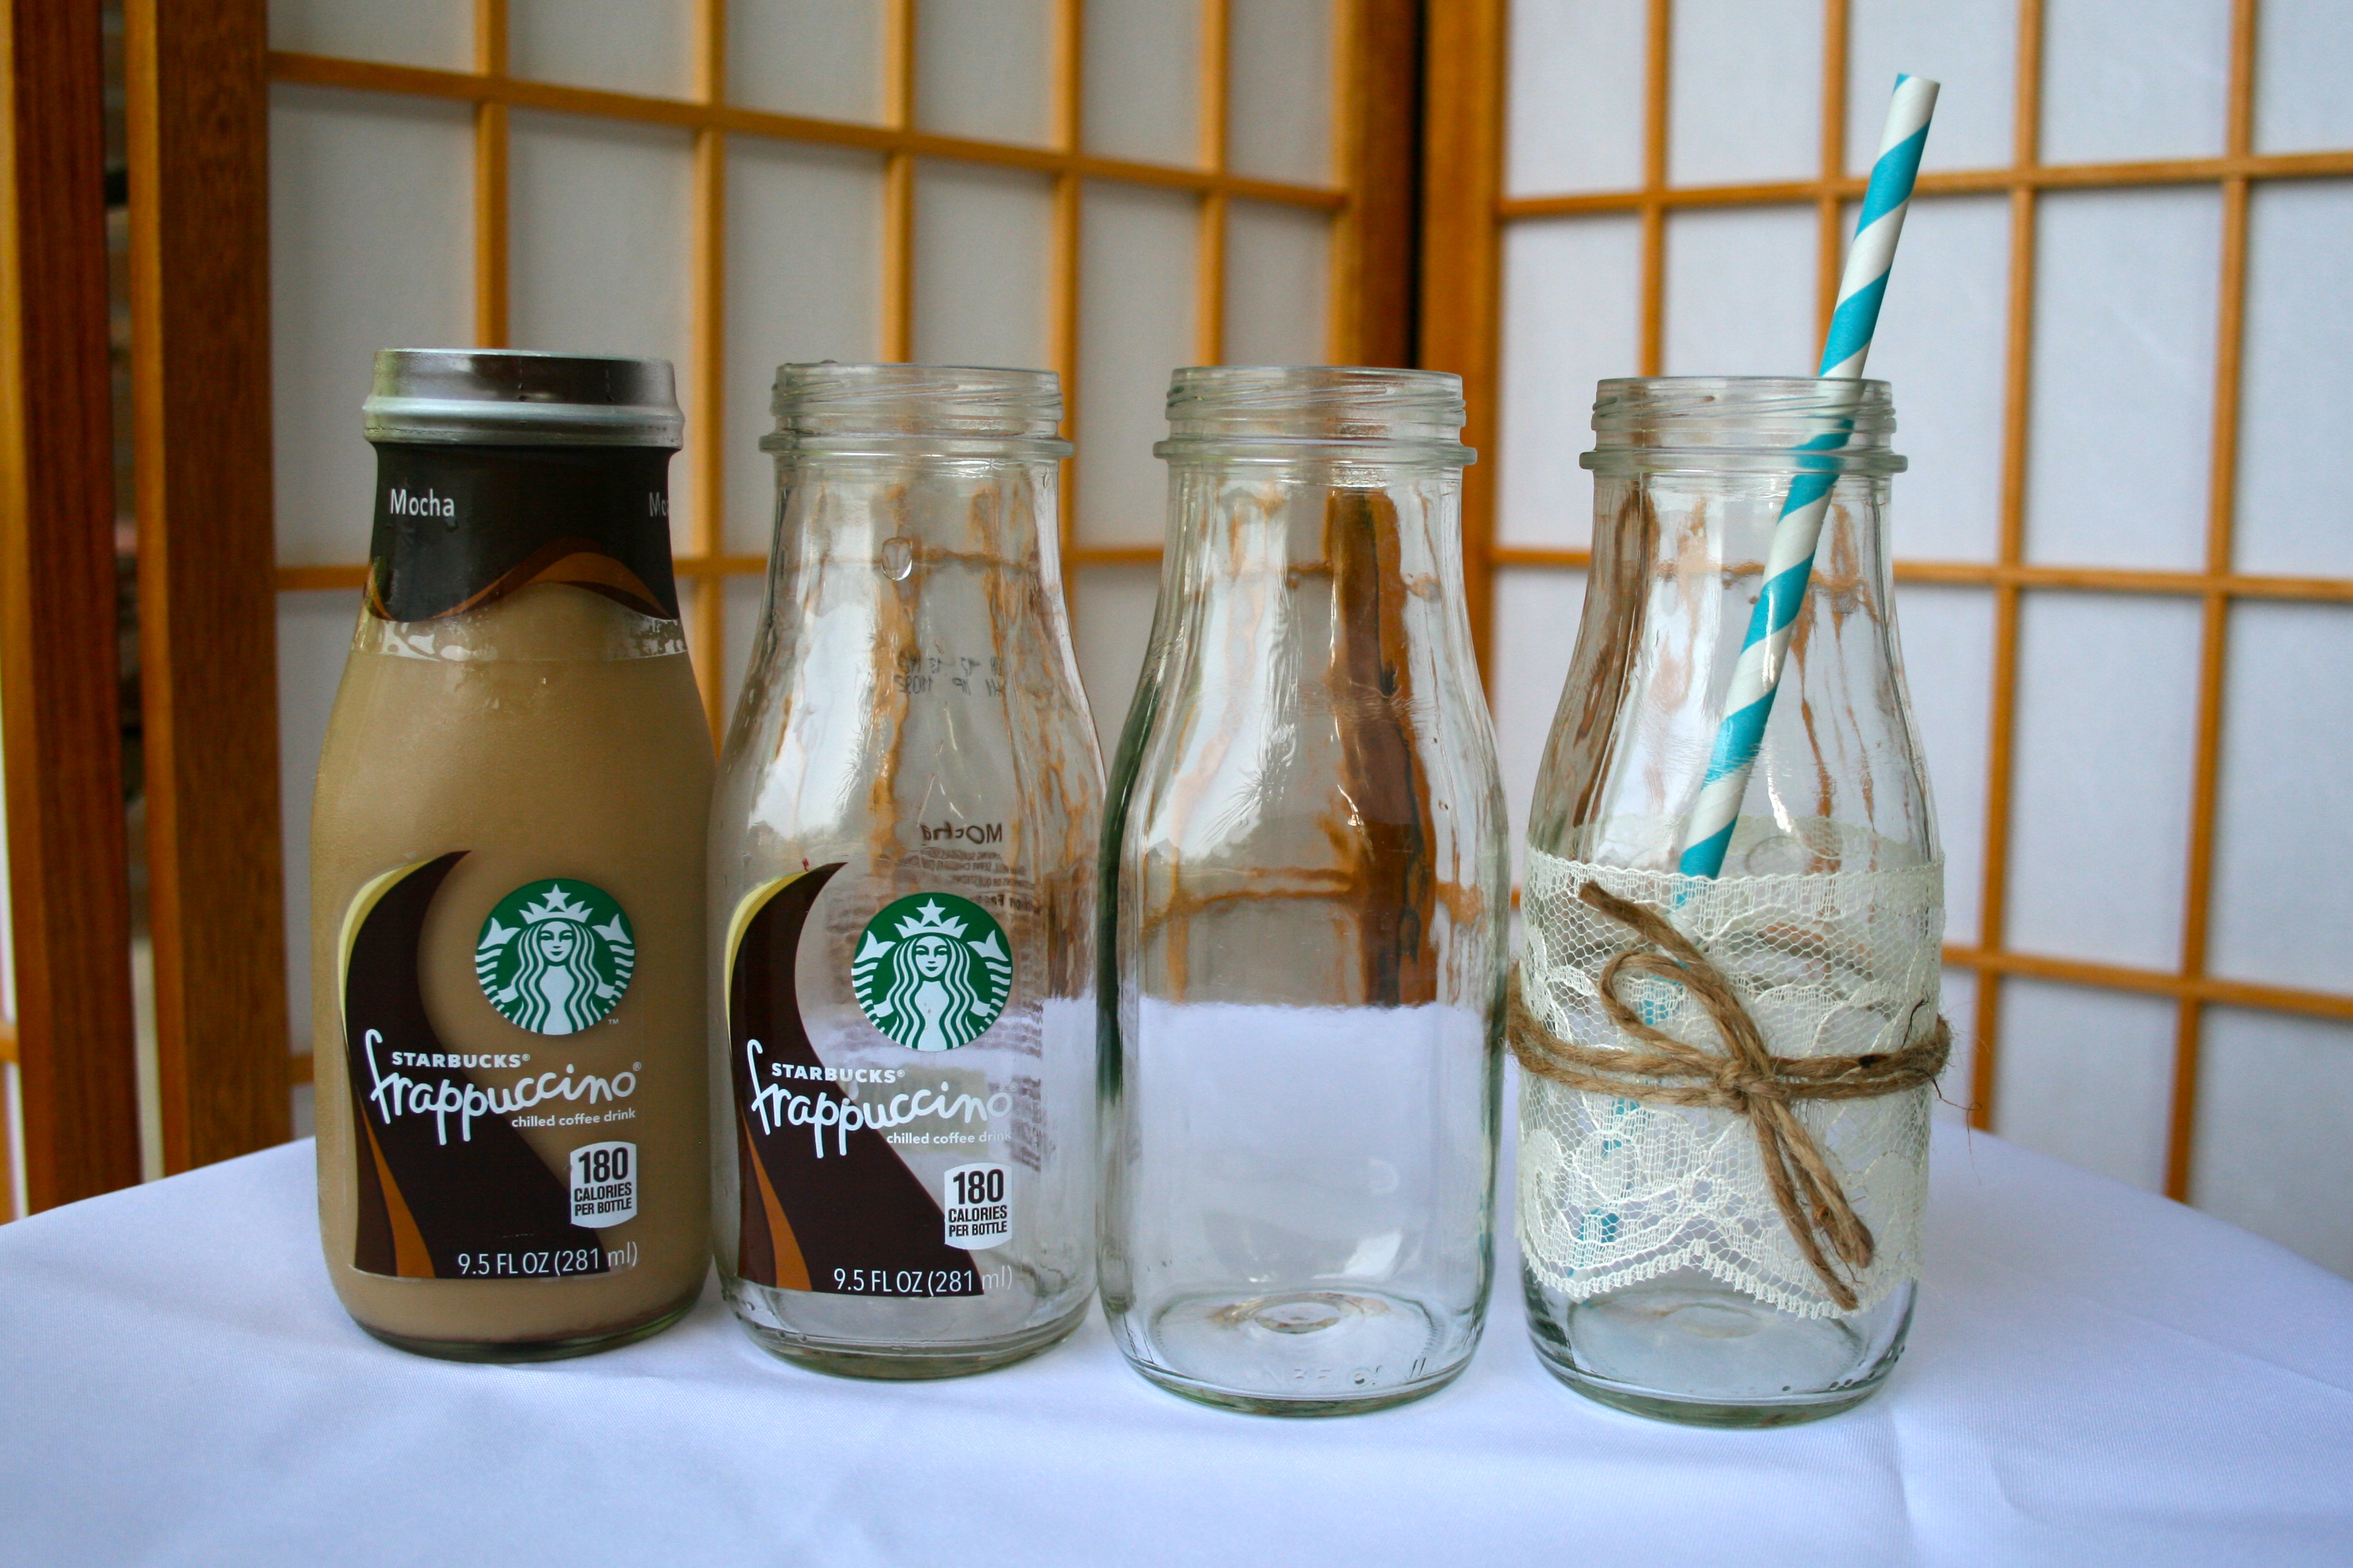
Last year, I used cleaned Starbucks Frappuccino bottles at both my son and my daughter’s birthday parties. I love that this helps the environment- we are reusing- and they look great! I make a big batch of lemonade or fruit water in a drink dispenser and let the guests help themselves. You can totally personalize the Frappuccino bottles by adding ribbon on the rim, or a personalized water bottle wrappers, or add some lace and twine. You could even add colored sugar (think crushed rock candy) to the rim. Talk about versatile!

Of course, the first step is to clean the bottles. Peeling off the Starbucks label and shoving them in the dishwasher isn’t going to cut it. You’ll end up with sticky bottles. The key is to use a little Goo Be Gone. Simply remove the label then spray the Goo Be Gone. (If you don’t have long fingernails, you’ll find it easier to remove the labels from the bottles if you soak them for up to 30  minutes in hot soapy water first). Once you’ve removed the label, spray on the Goo Be Gone. Allow it to sit for a minute and then use some soap, hot water and a sponge to remove the Goo Be Gone along with all the sticky residue from the labels. I then like to place the bottles in the dishwasher. So easy and quick!

how to clean and use Starbucks Frappuccino bottles for your partyhow to clean and use Starbucks Frappuccino bottles for your partyhow to clean and use Starbucks Frappuccino bottles for your partyhow to clean and use Starbucks Frappuccino bottles for your party

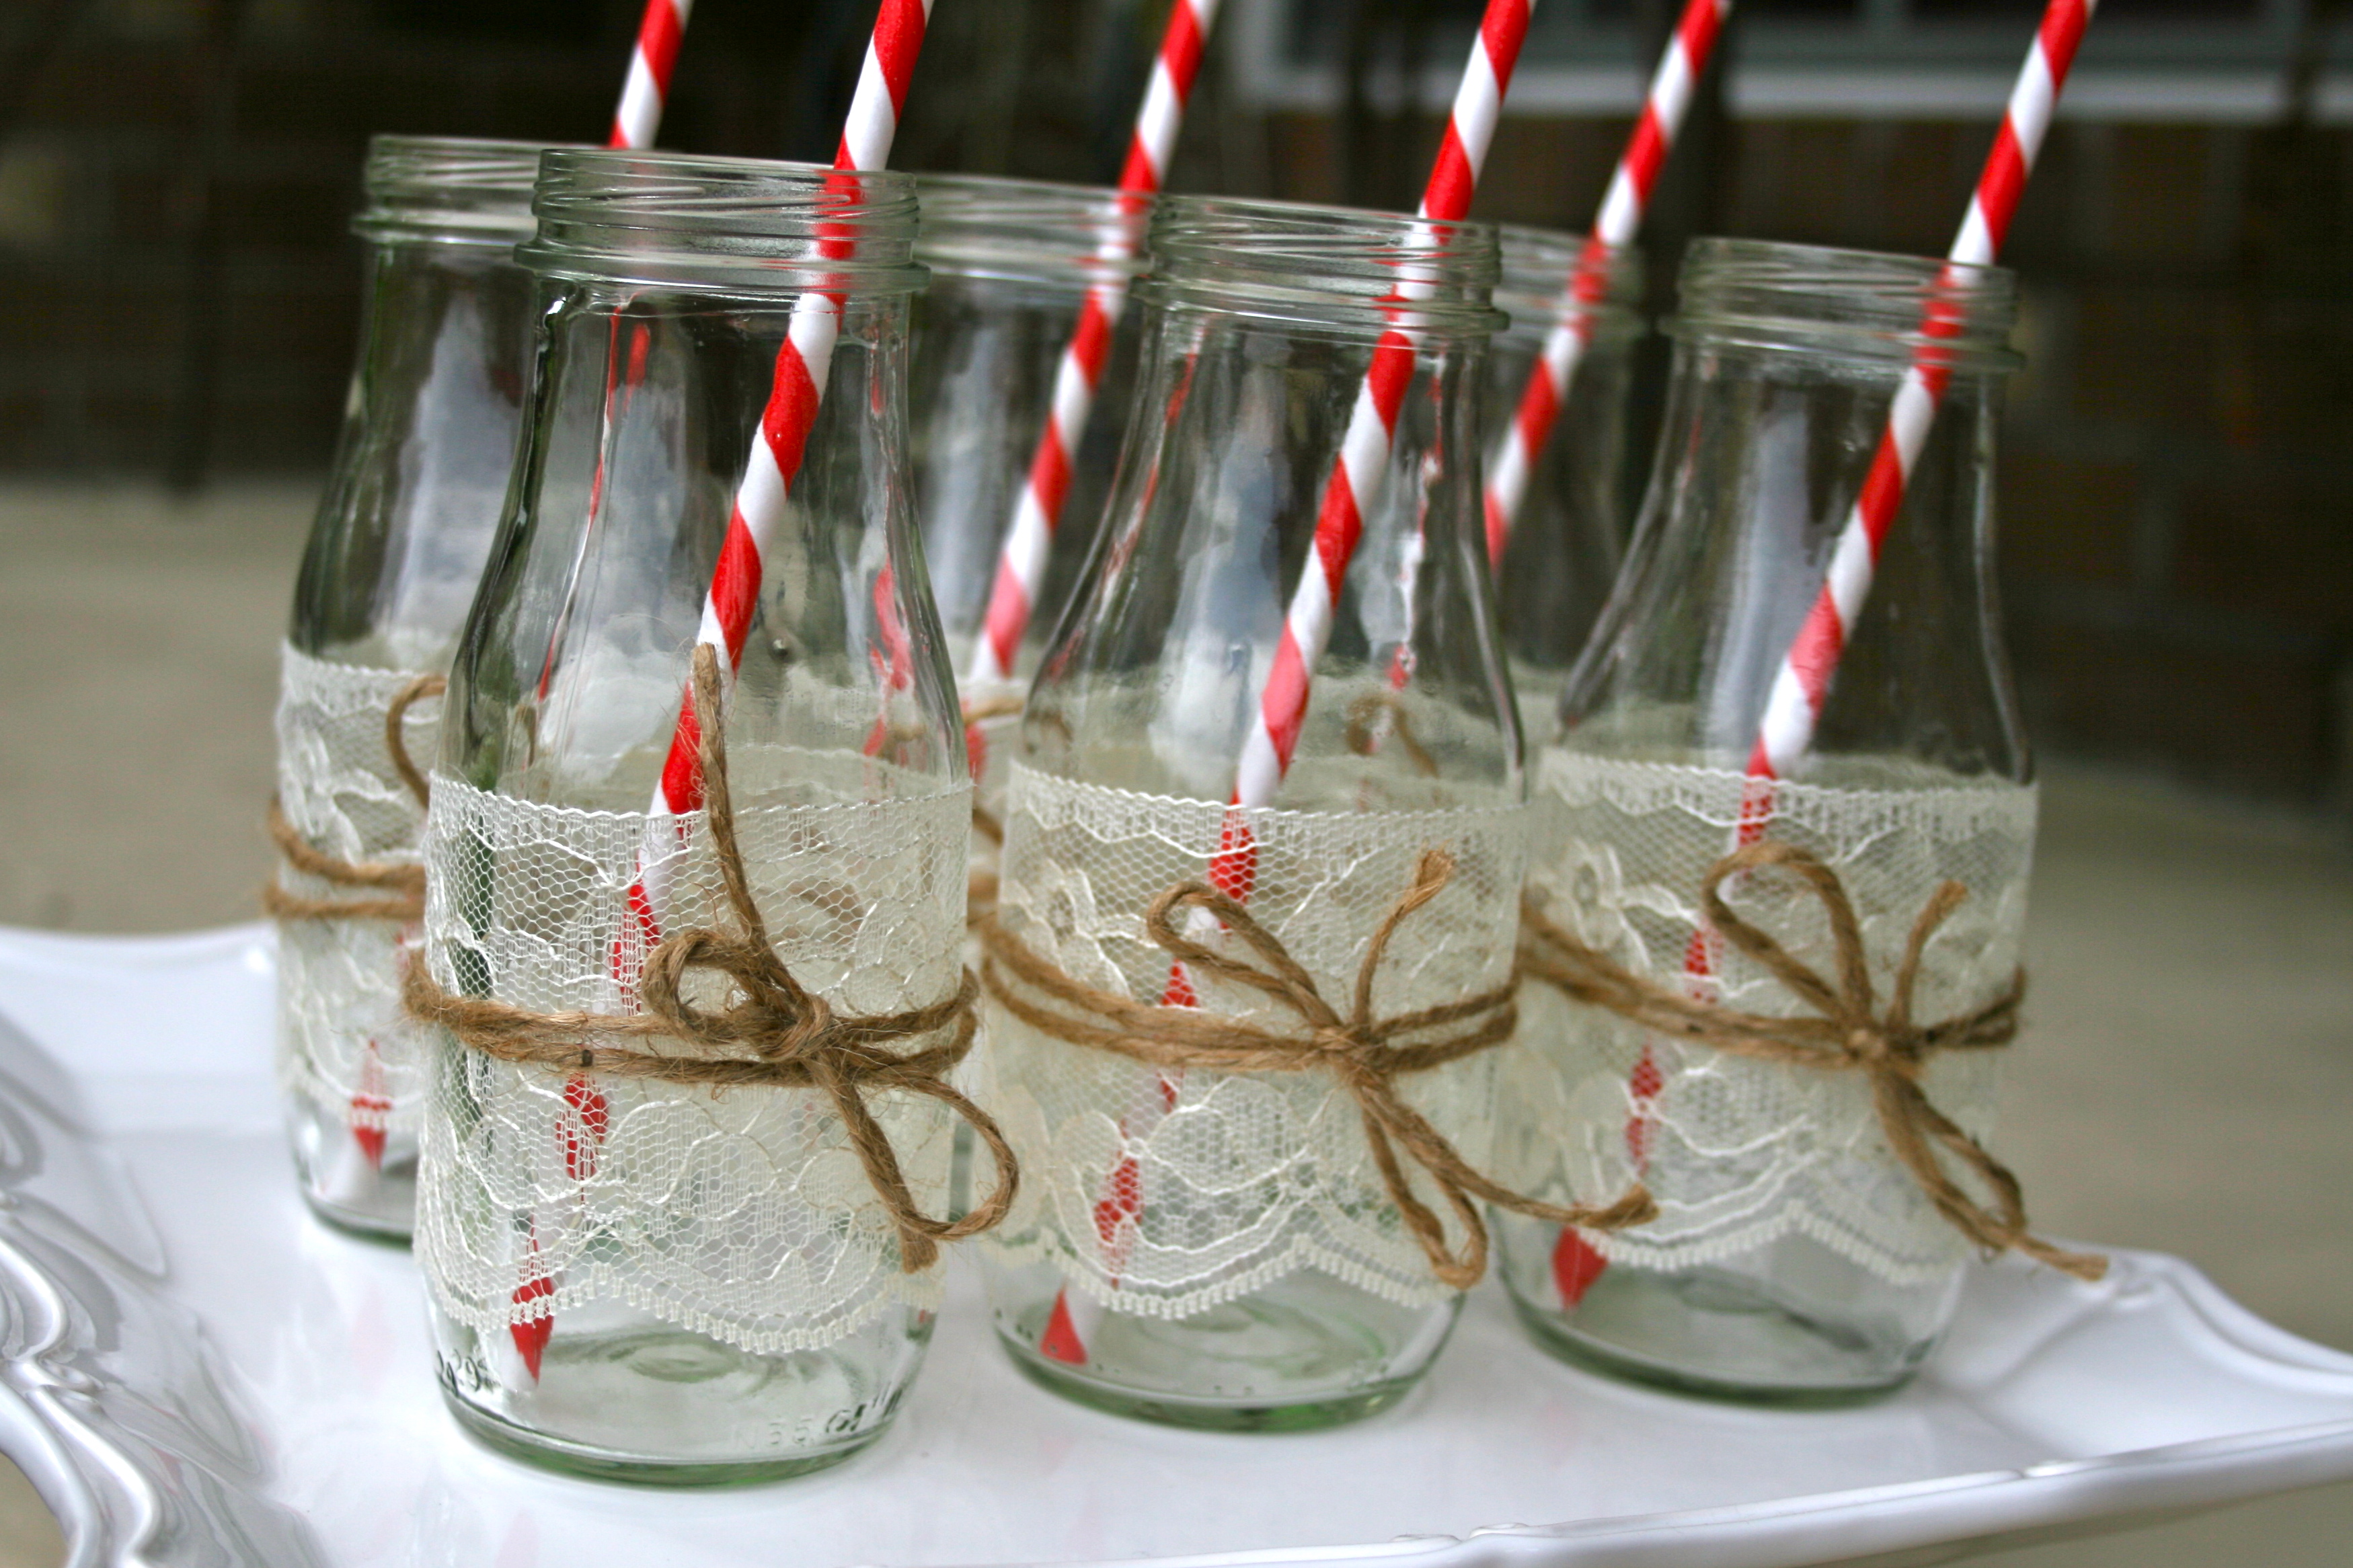
If you want to decorate your bottle with lace and twine for a shabby chic look, you will need 26 inches of twine and approximately 8 1/4 inches of lace per bottle. Attach the lace with a little tape and then wrap the twine twice around the bottle and tie. I got the lace at Joanns where it is sold by the yard. Add a striped paper straw et voila! I love this look and plan on using these bottles at my son’s Vintage Train birthday party on Saturday.

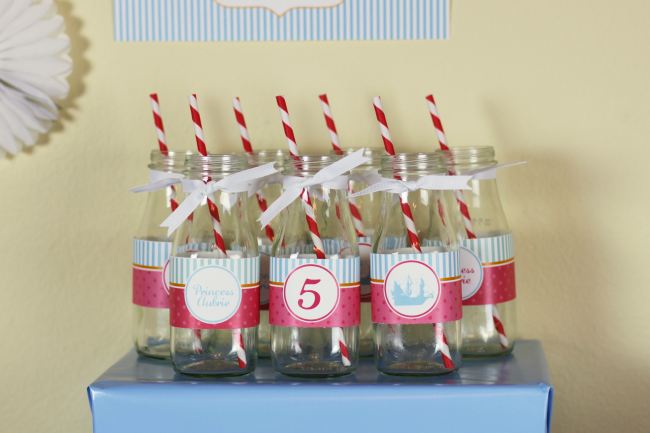
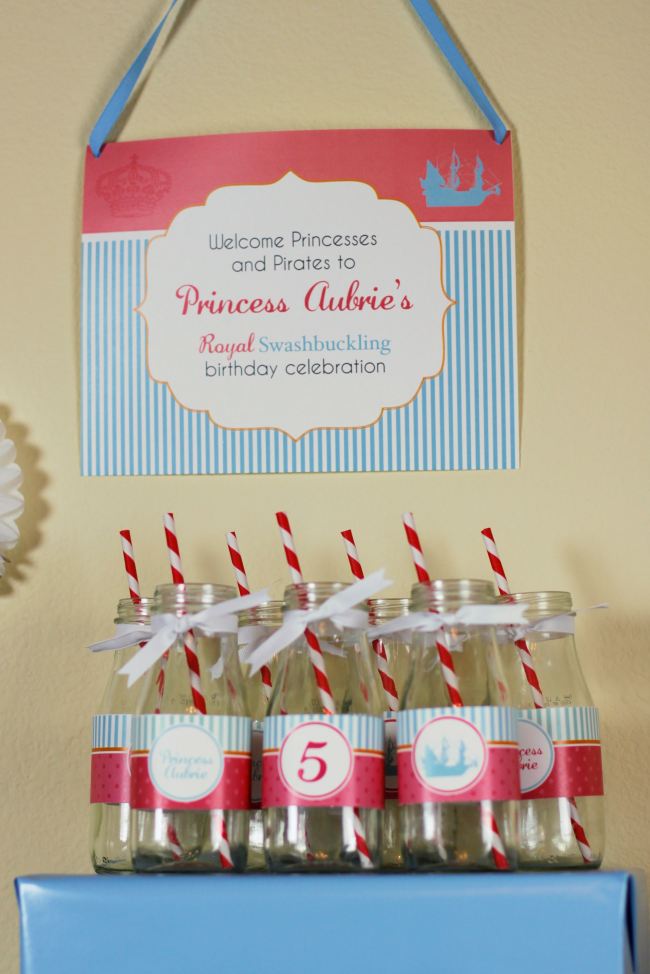
Here’s a photo of the Starbucks Frappuccino bottles that I used last year at my daughter’s Classic Princess and Pirate party. Hope this gives you some fun ideas. I simply used a little ribbon around the rim and then used a water bottle wrapper to personalize it.

princess pirate water bottle wrappers on Starbucks Frappuccino bottlesfrappucino bottles for party

how to use Starbucks Frappuccino bottles at a party

Please follow me on Twitter, Facebook or Pinterest! You can also contact me via e-mail: apartystudio@gmail.com

I love hearing your feedback and if you have any questions or need clarification, just leave me a comment on this blog post. Thanks… and happy party planning!


Tutorial: Marshmallow Clouds for Helicopter Birthday Party Favors April 23, 2013

marshmallow clouds for favors

For my son’s second birthday last year, I decided to do very simple party favors. In keeping with the helicopter theme, we handed out glassine bags of marshmallow “clouds” and these were a huge hit. They were very easy to put together! Hope you enjoy this tutorial and let me know if you decide to do these for your child’s party. Also, if your child doesn’t like marshmallows you could use white mini doughnuts.

Here’s what you’ll need:

The first thing you’ll want to do is fold your glassine envelopes so that they are all uniform. I didn’t measure them but I’m pretty good at eyeballing… if the thought of eyeballing this step freaks you out, then definitely grab a rule and measure how far down you need to fold these. You basically want to turn your envelopes into 5 1/2 inch squares so you’ll be folding down 2 1/4 inches from the top. Once you’ve folded the envelope, you will insert the marshmallows. I did three rows of three marshmallows so each bag contained a total of nine marshmallows. Of course, the number you get inside the bag will totally depend on the size of your marshmallows.

One all bag is full, you will refold the bag and add a little tape to keep it sealed. I then took some baker’s twine and tied it around the bag. You don’t really need the baker’s twine but it looks pretty and adds a polished look. Next, grab your large “marshmallow clouds” label and use your double sided tape to adhere this onto the front of the envelope. I designed these labels to measure 3 inches so that you can cut them into squares or use a 2.75 inch circle punch to cut out circles. I choose to cut them into squares and I used a corner rounder, too.

The last step is to attach the hang tag. I simply tied it using the baker’s twine. Since I am very fussy about consistency, I also used a tiny bit of double sided tape to adhere the hang tags to the envelopes. That way, I knew each hang tag was at the same angle. You certainly don’t need to do that but if having the tags hang at different angles is going to drive you potty, then I highly recommend making good use of your double sided tape 🙂

Here are photos from each step but if you get confused or have any questions, please leave a comment and I’ll answer you straight away.

how to make marshmallow clouds favorshelicopter party favorsfold glassine envelopeglassine envelopeinsert marshmallow insert 9 marshmallows into bagmarshmallow party favorstape the envelope closedAdd baker's twineTie twine, add labelAttach hangtag


Please follow me on Pinterest. I actually have a board dedicated to this fun party theme. You can view that here. Looking for more photos from the Helicopter party? You can see the album on Hostess with the Mostess right here. A special thank you to Danielle from All Things Great and Small Photography for taking photos at the party.

Also, follow me on Twitter, Facebook and subscribe to my blog. I can be reached via e-mail at apartystudio@gmail.com or my Etsy store.


Tutorial: How to Apply Glitter Tattoos April 1, 2013

Glimmer Art Body Glitter Tattoo


Last year for my son’s 2nd birthday and my daughter’s 5th birthday parties, we got a box of glitter tattoos from Shimmer Art. These were such a huge hit at both parties- even the mums and dads asked us for a glitter tattoo! I think we’ll have to incorporate a glitter tattoo station at their parties this year too. If you’ve never heard of glitter tattoos then prepare to be impressed. These are so much cooler (and more dazzling) than the regular temporary tattoos and they stayed on for well over a week. Yes, these beauties are waterproof.

The box had simple instructions that were easy to follow but if you are a visual learner then here’s a tutorial for you.

1. Remove the backing from the self-adhesive stencil. There were quite a few to choose from in the box and the kids took the selection very seriously. It was fun watching them pick out their favourites.

How to apply gitter tattoo

2. Apply the tattoo stencil where you’d like the tattoo to be and press down gently.

3. Apply the body glue. You want to use a thin layer and do it fairly carefully- you don’t want this to seep under the stencil.

Glitter Tattoos- How to ApplyApplying body glue for sticker tattooTutorial glitter tattoo

4. Allow the body glue to dry until it is almost clear. Now carefully remove the stencil sticker.

Remove the stencil adhesiveBody GlueGlitter Tattoo

5. Use the small brush that came in the kit to apply the glitter. Again, the kids loved choosing which colors they wanted. Use a generous amount of glitter. We found it super helpful to place the kids arm above a white sheet of paper so that the glitter that fell off went on the sheet. This made clean up a lot easier (and you can probably re-use that glitter too if you don’t mind a mixed look.) When you apply the glitter you can use a variety of the colors because the colors blend beautifully.

Applying glitter tattoo Glitter Tattoo image

6. The last step is to use the large brush to gently remove the excess glitter.  Again, the sheet of paper helps a lot here in keeping the area less messy. Et voila! A gorgeous glitter tattoo.

Glitter Tattoo at kids partyGlitter Tattoo Party

For my son’s helicopter birthday party, we used the Pop Classic kit and for my daughter we used the Princess and Hearts kit. This kit was fantastic for her because her party was a classic princess and pirates theme. The kits cost $25 and I think that’s a real bargain because the kids really did LOVE their glitter tattoos. These photos were taken at my daughter’s party. Thank you so much to Danielle from All Things Great and Small Photography for taking these photos. If you are in the Pensacola, Florida area and need a party photographer, I can highly recommend Danielle. Not only is she a total sweetheart and easy to work with but her photography skills are fabulous. You can like her Facebook page, too. It is located here. And her e-mail address is: MySmallMemories@gmail.com

Don’t these little girls look soooo happy with their gorgeous tattoos?

Glitter Tattoo Children's PartyPrincess Party Glitter TattoosGlitter Tattoo PrincessBody Art Glitter Tattoo


4th Lalaloopsy Birthday Birthday Party! September 15, 2012

I often get questions on my Facebook page and recently Jennifer contacted me regarding a blog post. She saw the Lalaloopsy party photos that Faith’s mom had sent me a while back. She asked me for tips on making ribbon wreaths. I’ve never made a ribbon wreath. I think they are utterly gorgeous and one day, when I have time, I do plan on testing my craftiness and I will make my daughter a cute ribbon wreath.

So, I let Jennifer know that there are some nice tutorials online, such as this one: http://lilpartyanimals.blogspot.com/2012/06/ribbon-wreath-tutorial.html Pick your ribbon colors and then add some mini Lalaloopsy dolls. Et voila! Jennifer raised a good point though- after the party, she planned on hanging the wreath in her daughter’s bedroom. The tutorial online used pins to hold each ribbon loop in place. Little kids + pins= not a good combination. Here’s what Jennifer said about making the wreath:

I used a wire floral frame, wrapped it in ribbon (this is what your are going to stitch the loops too), use whatever you like your only going to see it from the back so if it is going on the wall it really doesn’t matter, but if you are putting it on a door with a window, you may want it to look nice.  Then I cut all the ribbon to make the loops between 3 and 4 inches, and stitched the loops onto the frame.  I tried premaking the loops and then stitching them but it was much easier just to do it right on the frame that way you could manipulate the ribbon how you wanted it. Once all that was done, I added the buttons and the dolls.  I just looped thread around the necks of the dolls so you couldn’t see the thread and I did it very loose,  so that  could take them off easily for when my daughter wanted to play with them.  I can add more buttons or just leave it, but it is completly safe to put in her room for a decoration.


Here’s the cake that she made for her daughter’s 4th birthday party. She made strawberry cake because it had to be pink and she used vanilla buttercream frosting. For the buttons on the cake, you can make them out of fondant, but these were sugar and ordered through Sweet Estelle’s Baking Supply. Jennifer said that the kids loved the sugar buttons.


Thank you so much Jennifer for sharing the party photos with us and giving us great advice on making a ribbon wreath!


Tutorial: how to add a picture to CD template August 26, 2012

I recently added the option of a CD cover/image for the You are My Sunshine party collection. It seems to be a fairly popular item and I am considering adding this option to other party collections. One of the issues with selling CD covers is that the manufacturers change the templates or you may not be able to find the correct template at your local store. Right now, I have the PDF file aligned for Avery templates #5824 or #8692. Of course, I don’t have the time to do PDF files to align with every template on the market so what do you do if you can’t get hold of either Avery templates #5824 or #8692?

Here’s my solution… request a PNG file for your CD cover. I will send you a high resolution PNG file (300 dpi so perfect for print media) and you can add this to your template. Most templates are Word documents so regardless of where the CD picture needs to be aligned on the page, you can add your PNG file to the correct area. I’m going to include a bunch of screen shots to show you how to do this!

Basically what you’ll need to do is:

1. open your CD template as a Word document

2. go to Insert- Picture- from File


3. choose the PNG file that I have e-mailed you

4. Now that you’ve added your PNG file, you’ll need to right click on the picture and click Format Picture

5. Click on Layout and format the picture Behind Text. Click OK.


6. Now you are able to move the picture so that it is aligned correctly.

7. You will need to delete the template text boxes and repeat this process for the CD on the bottom of the page. Simply click on the text box and then hit delete on the keyboard. You could also do this first thing- before inserting your PNG files.


Let me know if you have any questions or problems adding a picture to your CD template. I think a music CD is a lovely party favor or you could use the personalized CD label for a CD that contains party photos and post these to out of town family members who were unable to make the big bash.

Of course, I also have these CD covers available for little girls, using hot pink instead of blue as an accent color 🙂


I hope you find this tutorial helpful. Please, don’t forget to follow me on Twitter and like my Facebook page!


Tutorial: Hershey Kiss Labels February 20, 2012


I’ve had a few requests recently for Hershey Kiss labels. These are totally adorable so I’ve decided to offer them in a range of colors and themes. They are a simple way to totally personalize your shindig. Personalized Hershey kisses also make really cute party favors.

So, how easy are these to put together? All you’ll need is some bright white heavy paper. I personally like to use 110 lb card stock, a glue stick and a .75 inch circle punch. The first thing you’ll want to do is print out the PDF file that I’ll e-mail you and cut the circles into stripes, as shown in the below photo.


The important thing to remember is to hold your circle punch up side down when you punch out the labels. This way you will be able to see exactly what you are punching and make sure that your label is even on each side/nicely centered. The sheet that I e-mail you will have 99 labels so you’ll get plenty of practice… he he he 😉 Once you’ve punched all your labels, dab them with a bit of glue from a glue stick and attach to the chocolate kiss. Avoid the washable glue sticks because that glue doesn’t tend to hold up on the foil.


The circles measure .80″ and are designed to be cut out using a 3/4″ (.75″) circle punch. The punch can be found at Michaels, Hobby Lobby, or your local craft or scrapbooking store. I used the EK Success Paper Shapers Medium Punch. Even though I recommend printing these on 110 lb bright white paper and then use a little glue to stick them on the kisses (a glue stick is perfect), you can use sticker paper. For instant stickers, simply purchase blank sheets of sticker paper found at office or craft supply store. If you don’t want to buy a whole packet of sticker paper, you can get these printed at Office Depot or Staples and request to have them print on sticker paper.

Check out some of the other Hershey Kiss labels currently available in my Etsy store. Just click on the photo to be taken to the listing. But, as always, if you do not see the color combination or style that you are looking for, please contact me as I am happy to take custom orders. apartystudio@gmail.com

You can follow me on Twitter and Facebook!


Tutorial: Water Bottle Wrappers February 19, 2012


Having personalized water bottle wrappers at your party is one of the simplest and most fun ways to decorate and add a touch of whimsy. I get lots of requests for water bottle wrappers and they are one of the most fun things for me to design. I especially love adding personal touches such as nutritional facts on the side. How cute is this gold and lavender water bottle wrapper for a baby shower:

I have loads of different water bottle wrappers in my store– for lots of different occasions but if you don’t see exactly what you want then you could send me an e-mail because I love custom orders.

Putting these water bottle labels on your bottles, is really easy. Here’s what you do:

So, to put these together…

1. print out the water bottle wrappers that I will e-mail you. Use high quality print setting (choose quality over speed).
 Depending on the design you choose, there will probably be five on a sheet. Ideally, you should print on heavy bright white cardstock. I like to use 110 lb paper.

2. trim the paper.  I recommend using a paper slicer to cut the labels so that you have neat, straight edges. When you cut the labels, do not cut any of the sides i.e. make sure your rectangle’s length stays 8 1/2 inches.  If your printer didn’t print to the edges then trim only one side.

3.  peel the existing label off the water bottles (this will leave some stickiness on the plastic bottle which will help your new labels stick a bit better). For these bottles, I have used Nestle Pure Life Juniors. I think the little bottles are so cute! The water bottle labels work on the full size bottles of water too.

4. wrap the new labels around the bottle. I like to use a little bit of tape (the magic transparent tape) or use a couple dabs of a glue stick on just the paper that overlaps.

This is the tape I like to use:

DO NOT put these on cold/refrigerated bottles. The condensation will make the paper wet and ruin your lovely labels.

I also sometimes like to mix things up and use them on Frappucino bottles when I serve cold drinks, such a lemonade out of a pitcher. These need a bit of goo be gone to remove the residual stickiness from the Starbucks labels and I usually put them in the dishwasher too! Don’t they look super cute?

Here are some other water bottle wrappers available in my store. Simply click on any of the photos to the taken to the item listing 🙂


Don’t forget to like my Facebook page, follow me on Twitter or Pinterest! I love comments and feedback 🙂


Valentine’s Day Lollipop Flowers with FREE Printables February 3, 2012

Yesterday, I posted free printables for lollipop butterfly Valentine cards. How adorable are these little butterflies? I think they are so cute and my daughter is super excited about taking these to her preschool for their Valentine’s Day party!

Today, I’d like to share some matching lollipop flowers. My son will be taking these for all the ‘little ladies’ in his preschool class! For this simple project, you’ll just need some lollipops, sharp scissors, card stock (110 lb is perfect) and some glue or a stapler.


So, to put these together. Simply print out the free download on heavy bright white paper or card stock. Then, use your scissors to cut out the flowers and the hearts. Each green heart will be the flower’s leaf. You could have your child write their name on the leaf or the flower. Take your first flower and fold it in half as shown above and then fold it again so that you can snip off the tip. This will create a hole for you to put your lollipop stick through. Unfold your flower and slip in the lollipop stick. Make sure the hole isn’t too big or the paper will not stay at the top of the lollipop stick! If that does happen, you can always add a little bit of tape to the underside to hold it up 🙂

To add the leaf… you have a couple options. Either way though, you need to fold your leaf in half to get a crease down the center. You can either:

1. attach the heart to the lollipop stick and use some glue to hold it togehter

2. fold the heart around the stick (the crease is pressed against the stick) and staple the leaf


I used Tootsie Roll Valentine Pops which I purchased at my local Walmart. They are cherry flavor and have a pink wrapper. I actually got the idea for these flowers and the butterflies from the box! You can download the FREE file from here or just click on the image below.


Let me know if you have any questions and if you make these, let me know how they turn out! We think they are adorable. Remember to like my Facebook page and follow me on Twitter and Pinterest!


Valentine’s Day Butterflies with FREE printables! February 2, 2012


My daughter will be taking Valentine’s Day lollipop butterflies for all her friends at preschool. She is super excited and keeps talking about Valentine’s Day which I think is super sweet since I don’t recall ever being excited about this holiday growing up in England. It just wasn’t a big deal. February in England was just a blah month so I am happy to see her get so excited and have a few fun Valentine’s Day activities planned for the kiddies.

I picked up a box of Valentine lollipops at the grocery store and on the box were the cutest ideas for a craft, to make your own Valentine cards. Check this out:


Doesn’t that look like a great idea! So, I turned on my computer and whipped up some colorful butterflies and flowers. I’ll post the  flowers tomorrow but here are the butterflies, all cut up and ready for their lollipop sticks.

For this simple project, I picked up some wiggly eyes from my local Joanns craft store. They’d run out of sticker ones so unfortunately the ones I got required some glue in order to get them stuck on the lollipops. As always, when crafting, I highly recommend having decent sharp scissors. I absolutely love my EK Success Bee Precision Scissors. Spending $10 may seem ridiculous for a pair of scissors but they are well worth it. They are amazing but I have to keep them hidden because they are seriously sharp and I don’t want either of my kids getting hold of these!


So, to put these together… print out the free download on heavy, bright white paper. 110 lb card stock is ideal. Then, cut out the butterflies. Fold the butterflies in half to create a vertical crease down the middle. Whilst the butterfly is folded, cut the slits (basically, just cut along the grey lines) and the unfold your butterfly. You can now slip the lollipop stick between the slits and if you’d like, you can attach some wiggly eyes!

Of course, I am going to share the butterflies with you! I hope you are able to use these for your children. There are six butterflies on each sheet, along with simple instructions. And, if you are more traditional and prefer pinks and red for Valentine’s Day, then you are in luck since I have a sheet of butterflies in cute pinks and red to share, too! Simply click on either of the pictures below to download the PDF files from Scribd.com


Enjoy and let me know how your Valentine projects came out xxxx

Please follow me on Facebook and Twitter! I love your feedback and if you have any ideas of projects, please leave me a comment!


Banner Tutorial August 1, 2011

Here’s another look for putting together a beautiful birthday banner. There are a few different ways to put together a banner. If this isn’t the look you were going for then check out my previous tutorial on hand tied banners over here.  For pennant banners, I prefer this look. It is also much quicker to assemble (hooray). For this tutorial, I am making the banner from the Fiesta collection available from my Etsy store. I love the bright colors!

You will need:

paper slicer

scissors

printed banner from my store

3/8 inch grosgrain ribbon

hole punch

pencil

Step one:

Cut your banner letters using the paper slicer.

Step two:

Punch holes in the corners. Where you punch the holes isn’t too important, however, you want all the letters triangles to be identical. Consistency is the key to a beautiful looking banner. What I like to do is use some scrap paper to make a template. Mark your first hole on the template and punch a hole. Now use the template on the actual triangle letter. For the opposite side, flip the template over. This ensures that the hole is in exactly the same location. Once you’ve punched the two holes in your first letter, you can place this letter over the other ones to mark where you are going to punch the rest of the holes.

Step three: 

Once the holes are all punched, you can thread your ribbon. For this banner, I used a total of 78 1/2 inches of ribbon but you can use less if you have smaller gaps between the individual letters or between the two words. Also, if you don’t want one very long banner, you can make two banners- one for Happy and another one for Birthday. Don’t forget that you will need extra ribbon on the ends if you are planning on tying the banner to something.